

How To Draw A Moody Face
4 top tips for drawing an anguished character

To convey strong emotion when information technology comes to how to describe a face up, I make use of all the elements in my image: posture, expression, setting, storytelling, colour, mood and composition. I first gather references of anguish from the web, recognising that information technology'southward very close to concrete hurting – hence the screwed-upward eyes and furrowed brows. In sketching out the basic pose and composition, I try to tell the story of the reason for the character's pain, in this case the destruction of his robot friend.
I choose the photographic camera angle to focus attention on his facial expression just also pay attention to the posture, which communicates his anguish. I then detail the image with line art, clarifying his facial expression and all of the of import details in the epitome.
- How to depict manga
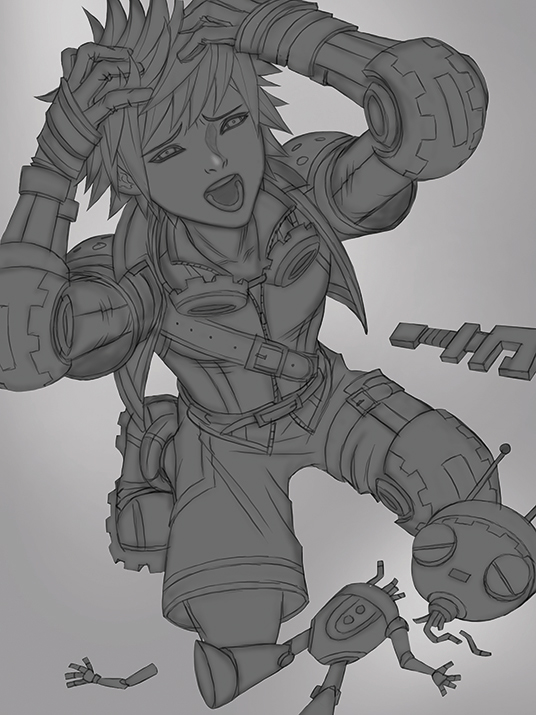
When the line art is finished, I add together the colour and lighting to focus attention on the primal areas, with the face up highlighted and red elements to depict the eye to both the character's confront and his robot. Elsewhere I use cool colours to create a sad mood, and add rain to show that the environment is rainy and moody, emphasising the sadness of the scene. See how I pieced together my image below.
01. Collecting research material

I first gather reference of ache from the web. The images I've used show people with their hands on their heads in disappointment, mouths open up and eyes and eyebrows squinted and furrowed in pain. In this example, I don't copy the references exactly. I but use the references to get the basic facial expression and pose, simply I depict it at a different angle in this scene.
02. Laying out the pose
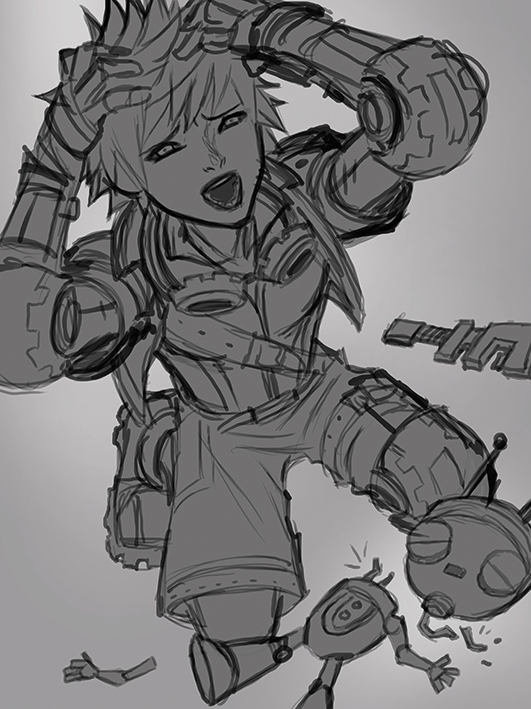
I first sketch out the basic pose and limerick, showing the reason for the grapheme'south pain. In this scene, the character is a young inventor and mechanic and the robot friend he built has been broken and is lying in pieces in forepart of him. The camera bending is placed above the character to capture his facial expression in detail to communicate his ache and sadness.
03. Adding line work
I then detail the prototype with line art, clarifying the facial expression and important details. Other storytelling details are important in this stage, like the gear shapes on the character'due south armour, communicating that he'due south a mechanic or inventor. I repeat the gear shapes in the robot, implying that it was possibly built past the grapheme. I too add details to pilus and clothing.
04. Blocking in color

In one case the line art is finished, I add the colour, lighting and rendering. I use red to make the viewer look at both the character'south confront and his broken robot. I then add rain and atmosphere to distant objects to show that the surroundings is rainy and moody, further communicating the sadness of the scene. I likewise use cool colours in the scene to arrive feel sad and dreary.
This article was originally published in ImagineFX magazine issue 141. Buy it hither.
Related articles:
- ten top tips to improve your sketching skills
- Create a self-portrait with only 4 colours
- Creating line art for a colouring book
Related manufactures

Source: https://www.creativebloq.com/advice/4-top-tips-for-drawing-an-anguished-character
Posted by: johnsonyousterromme.blogspot.com
0 Response to "How To Draw A Moody Face"
Post a Comment